
EASA STS preparation
Free EASA STS lesson: flight geography and contingency volume
Try a free interactive STS lesson about operational procedures, with a 3D model, guided explanations and a knowledge check. No sign-up required.
By Airspace School · Information checked
Flight geography and contingency volume
Drag the model to look around. Use Next to follow the explanation. The complete text remains available below if 3D is unavailable.
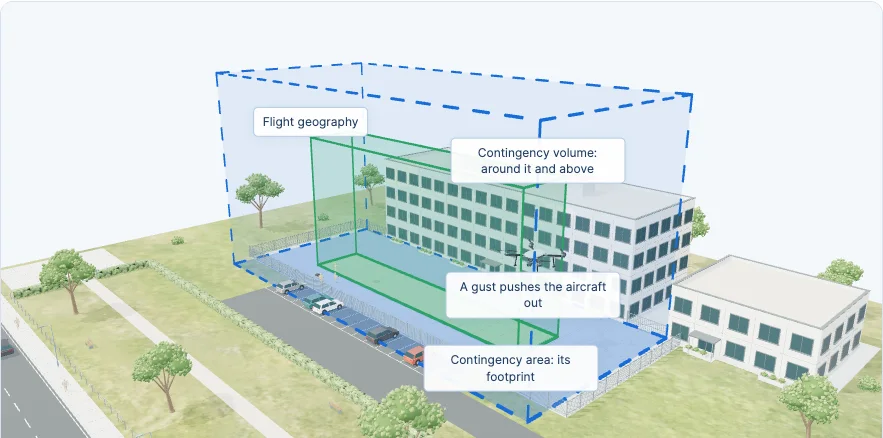
Illustrative teaching model. Distances and volumes are not a flight plan.
1. Define the intended flight space
The blue space is the flight geography. It is the volume of airspace in which you plan to fly using normal procedures. It includes the space needed for the intended aircraft movement, rather than being just a line drawn on a map.
2. Add space for a contingency
The amber space around it is the contingency volume. Use contingency procedures when there is an indication that the aircraft may leave the flight geography; do not wait for it to cross. These procedures bring the situation back under control. The flight geography and contingency volume together make up the operational volume.
3. Follow a boundary crossing
In this example, the aircraft moves from the centre of the blue space into the amber space. It has left the intended flight geography but remains inside the operational volume. The pilot uses contingency procedures. Move the aircraft control to see the boundaries it crosses.
4. Keep the other boundaries distinct
Use the applicable emergency procedures when there is an indication that the aircraft may leave the operational volume, including triggering flight termination as required. This is a different boundary from the edge of the flight geography. The ground risk buffer lies on the ground beyond that volume’s ground projection; it is not another space for normal flight. The dimensions and procedures must suit the applicable standard scenario and operation.
Now identify which procedures apply to a position in the model.
Sources
For the A2 syllabus, see UAS.OPEN.030 and its accompanying guidance. For STS, see Appendix 1 and Attachment A. Confirm local arrangements with your examining body.